Deploy and Manage
Zerynth Device Manager (ZDM) is a device and data management service that speeds up the development of scalable, secure and reliable IoT solutions.
Main features:
-
Devices onboarding and provisioning: enabled with gold-standard security practices;
-
Devices lifecycle control: allowing complex tasks like remote procedure call and over the air updates (FOTA) through REST APIs;
-
Data Management: storage, aggregation, plotting and feeding of data to the final IoT Application;
-
Easy integration with third parties services and frontends.
Each Zerynth user has access to the ZDM SaaS instance hosted on Zerynth servers. The ZDM can also be hosted on-premises, using container technology, on top cloud providers (such as Azure, AWS, IBM, Google), or on your server.
The Zerynth Device Manager is a device and data manager for IoT applications. Zerynth Device Manager helps you register, organize, monitor, and remotely manage IoT devices at scale. ZDM allows managing devices and also collects and aggregates the data they produce.
ZDM is device and OS independent, allowing the connection of microcontroller-based devices programmed in Zerynth but also microprocessor-based devices, like the Raspberry Pi and any other PC application.
This device produced data is collected, aggregated, and stored by the ZDM, allowing IoT application frontend to retrieve the data by means of RESTfull API or using the ZDM Gates.
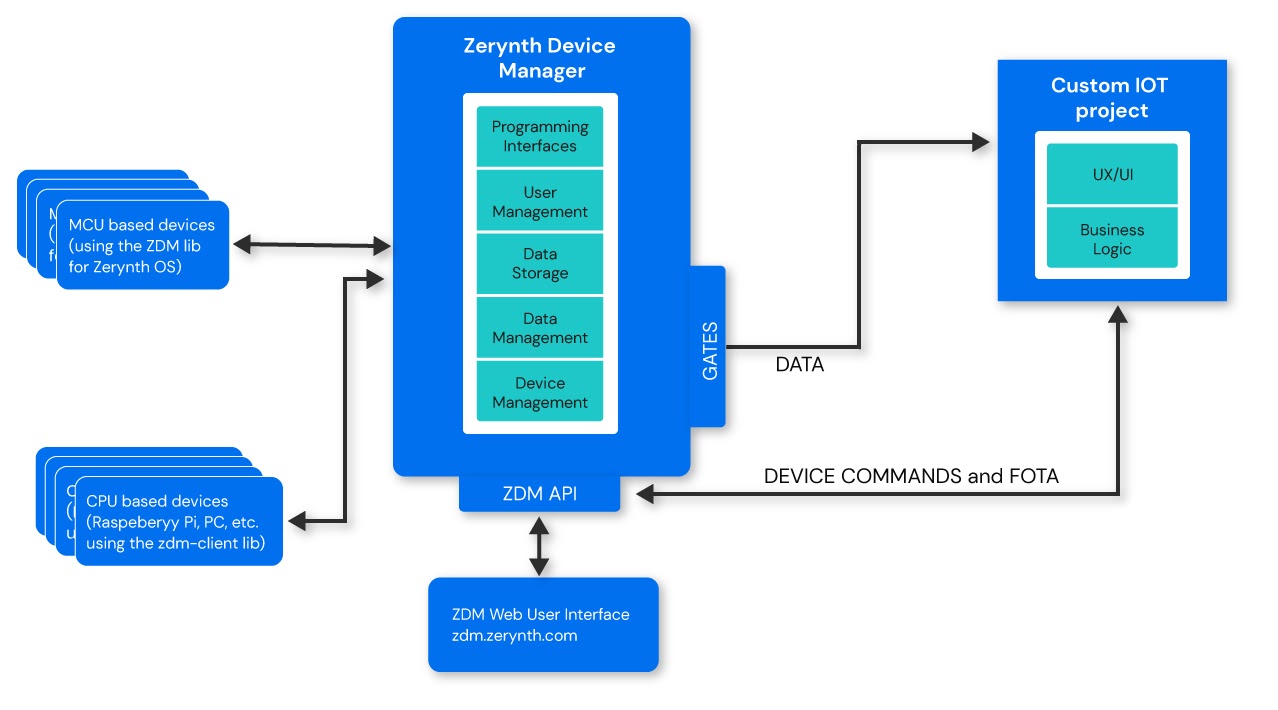
The Zerynth Device Managers is based on the following key concepts;
-
A Device is the smallest entity you can find in the ZDM. It is represented by the physical IoT device connected with the ZDM via MQTT.
-
A workspace is the entity that groups and isolates devices and their produced data. You can imagine the workspace as the main folder of your project.
-
A fleet is a group of devices belonging to a workspace. You can use fleets to group devices with similar features and applications. Fleets allow sending bulk device commands, FOTA updates and Jobs;
-
A Tag is a data label used for querying and aggregating data. Each device can publish data on multiple tags and the ZDM will take care of aggregate and align them;
-
A Gate is an interface between the ZDM and an external service like your project frontend application. Gates are typically used to stream data out from the ZDM. In the beta version a Gate can stream data from one tag only, multiple tags gates will be added soon.
-
A Job is a command sent by the ZDM to a device. Jobs are used to activate device firmware functions like: reset, send status, and FOTA updates.
How to access the ZDM
ZDM can be accessed via the web user interface available at https://zdm.zerynth.com or using the ZDM CLI (command line interface) that is integrated into the Zerynth SDK (download from https://www.zerynth.com/zsdk/).
To use the ZDM service you need a Zerynth account, if you do not have it yet you can register to zerynth from https://backend.zerynth.com/v1/sso
The ZDM web user interface
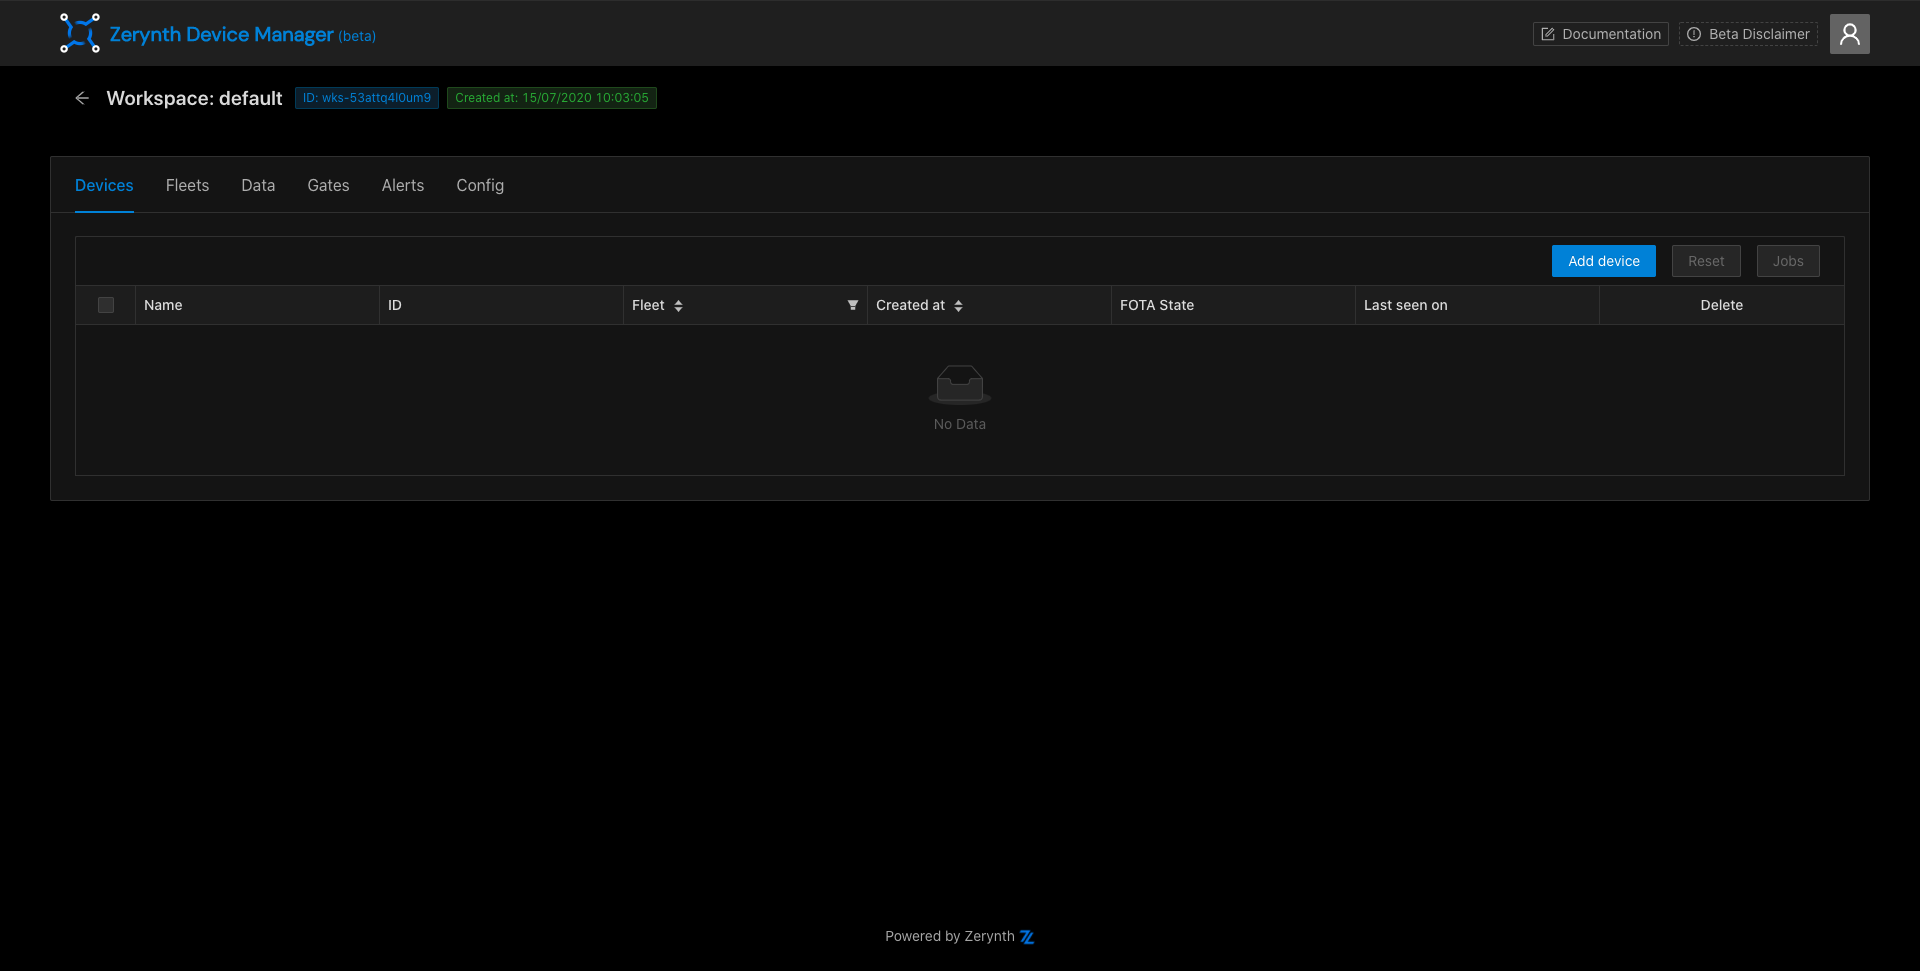
Go to https://zdm.zerynth.com and login with your zerynth account, you will reach the ZDM home page.
Home Page

From here you can get an overview of your workspaces, search for them and add new ones.
Each registered user has the “Default Workspace” endowed with the “Default Fleet” that can be used for starting with the ZDM. You can easily add more workspaces and fleets if needed. The Default workspace can’t be deleted.
Keep your project well organized! We suggest using a new workspace for each new project.
Add new Workspace
To add a new workspace, just click the “New Workspace” button on the ZDM home page, indicate the name and optionally add a description and some fleets.
After clicking “Add” the new workspace will be added to the home ready to be managed.
If you don’t indicate any fleet in the form, the default fleet will be created automatically.

Workspace
To open a workspace just click on its title in the homepage grid. The workspace page allows you to configure the workspace, manage associated devices, create gates and lunch jobs on your devices.
Configuration
The configuration button:  is used to:
-
delete the fleets (you can delete only empty fleets)
-
delete the workspace itself (only if it doesn’t contain devices)
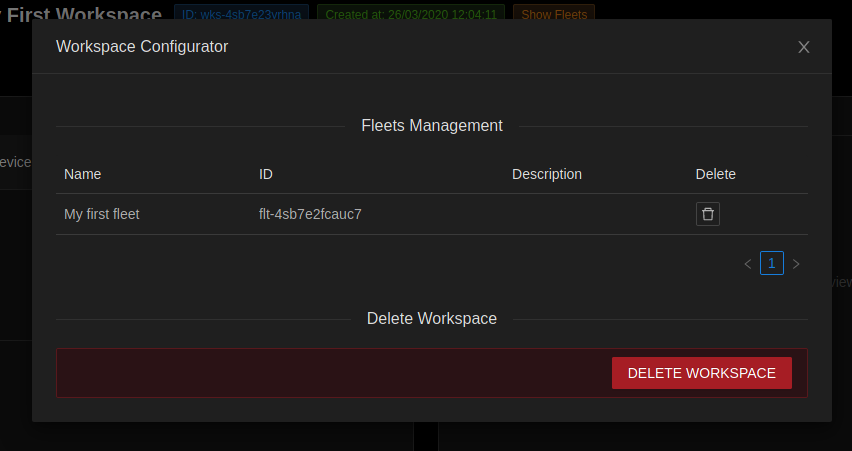
Fleets Management
On the configuration page, you can view and delete fleets by clicking on the recycle bin icon.
Delete a Workspace
Further down the configuration window, you can find the button to permanently delete the workspace. Remember: only workspaces that do not have devices inside can be deleted.
Gates
Gates are the interfaces of the ZDM with external services. The ZDM aggregates data published by your devices into gates that can be exposed to external services via: webhooks and MQTT (coming soon). Gates for specific third party services are also available: we currently support Ubidots, many others will come soon.
Add new Gate
To add a new GATE click on the Add new Gate button, and select the type of Gate you want to create. The new gate form will open.
Webhook
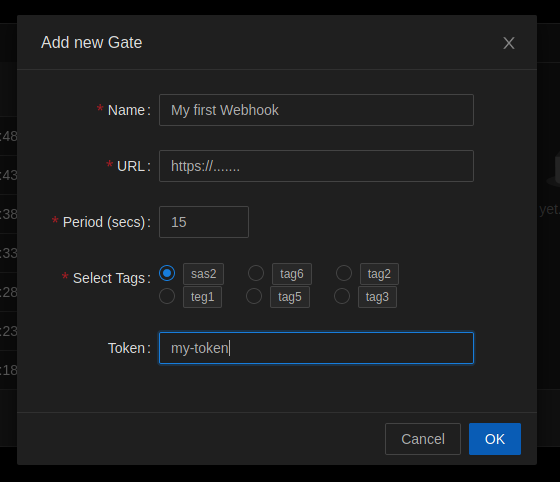
For the Webhook gate, you have to fill the form with:
-
The Gate’s name;
-
The URL of the endpoint that will receive your data;
-
the sending period expressed in seconds;
-
Select the tag you want agg to aggregate in the gate stream. in Future gates will also support multiple tags.
-
A token (if needed).
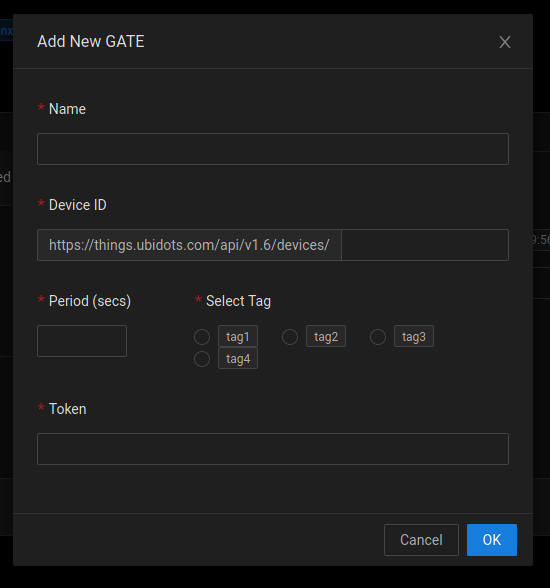
Ubidots GATE
In the Ubidots gate creation form you will find the Ubidots address URL pre-filled. To add a Ubidots webhook you need to add the “device label” of the Ubidots device where you want to receive the data. If you have already created a device on Ubidots, copy it here otherwise insert a device name you prefer (without spaces) and Ubidots will create it automatically when the ZDM gate is created. The Ubidots token can be copied from the Ubidots API credential section of the Ubidots user menu. In the Example 2 of this guide you will find more details on how to create a device in Ubidots.
View, activate/deactivate, modify and delete a Gate

Once created, the Gates are added to the Gates tab, and from here it is possible to activate/deactivate them, edit and delete them.
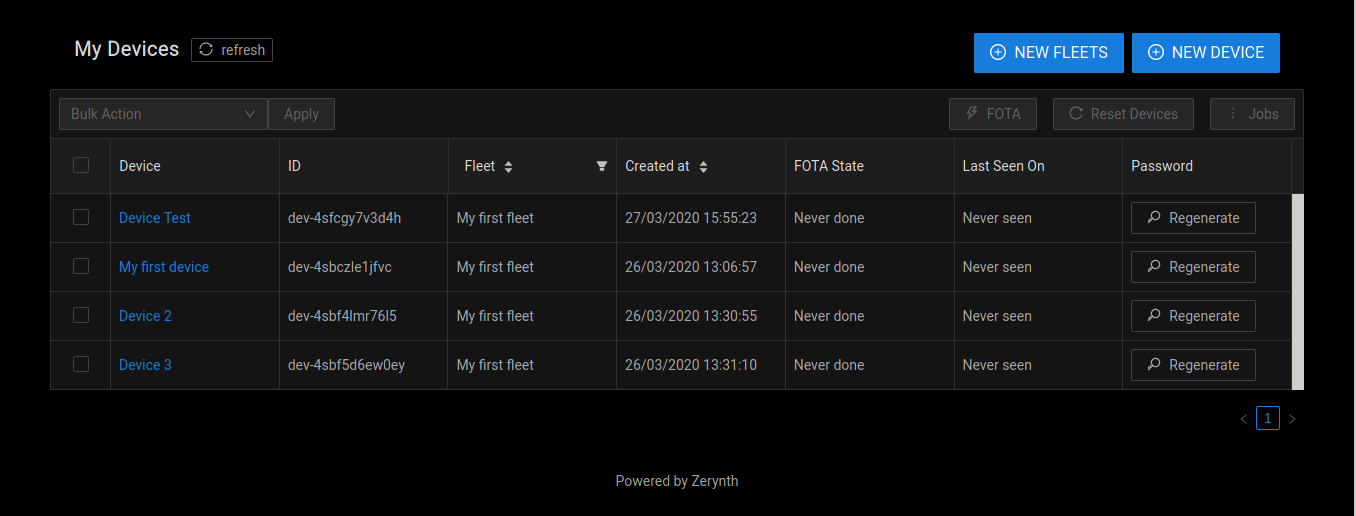
My Devices
At the bottom of the workspace page, you will find the list of the devices associated.
Devices can be filtered by fleets and ordered by creation date. Through the table you can see the “FOTA Status“, so if the device has never received a FOTA you will see: “Never Done”, or “Firmware Version + Data” of the last successful FOTA update. In the device tab you can also get information about the last message sent by the device to the ZDM.
Selecting one or more devices from the list you can perform mass operations such as FOTA, Custom RPC, Device Reset and other bulk actions that can be selected from the drop-down menu on the left.
Add new Fleet
You can add a new fleet on the Workspace using the “Add new Fleet” button. The form allows creating multiple fleets, just click the “+ add fleet” button, fill the form and click “Add” at the bottom of the dialog.
Add new Device
Just click on the “Add New Device” button on the workspace page. You will be prompted with the device creation form. Here, just fill in “Device Name” and select the fleet to which the device will be associated from the drop-down menu.
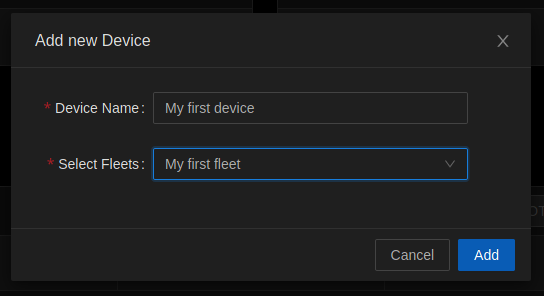
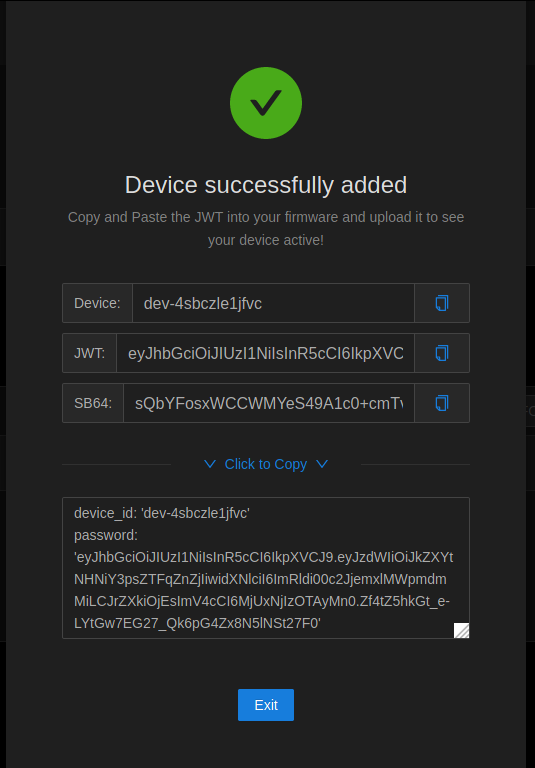
Once successfully created, the screen will show the device id and the Password required for device authentication on the ZDM. Please copy the password and the device id, you will need to paste it in the Zerynth Device firmware or in your ZDM client lib based application.
The device created form also reports a ready to copy code that you can easily paste in the ZDM lib and in the ZDM client lib examples.
Very important: for security reasons, the device’s password can’t be re-visualized. So, once this window will be closed you will no longer be able to retrieve the generated password!.
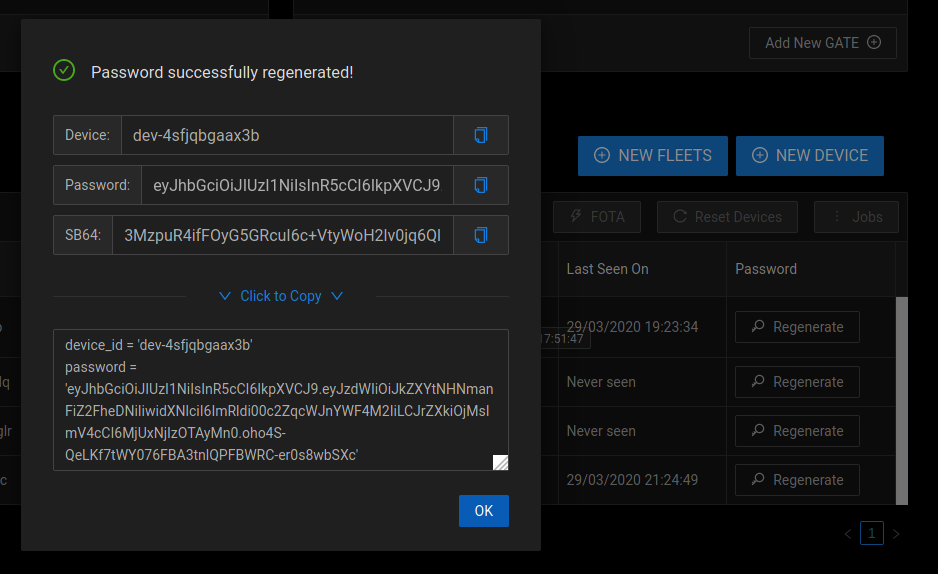
If you lose a device password you can always regenerate it from the specific device page. Device pages can be opened by clicking on each device name in the device list.
Regenerate device password
Bulk Actions
With the bulk actions you can do:
-
Delete a device
-
(many others will be added soon)
just select one or more devices from the table, choose one of the actions in bulk from the drop-down menu and click on “Apply”
FOTA
The FOTA (Firmware Over The Air) update procedure is used to update the firmware of one or more devices remotely.
Important
In order to perform the FOTA of a device you need to virtualize it with a “Fota Enabled” virtual machine.
The first step to start a FOTA update on your devices is to prepare and upload a firmware to the ZDM cloud.
To upload your firmware, open the Zerynth Studio (Note: Zerynth studio v. 2.5.0 or higher is required). Open the project you want to compile and use for the FOTA and click on the Zerynth Device Manager Icon on the left vertical menu.
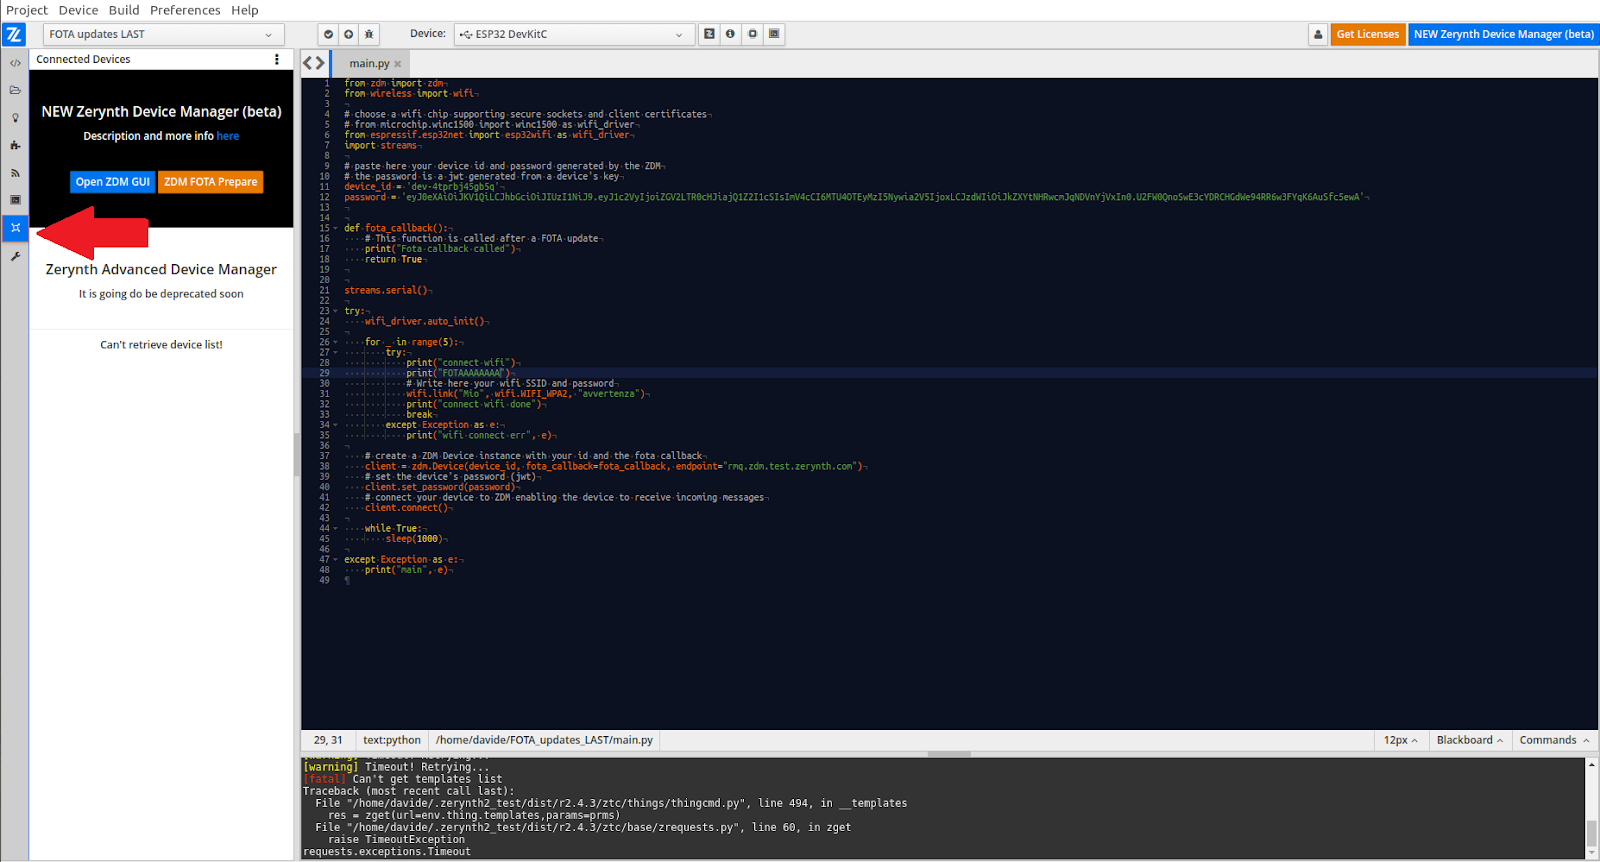
Now click on the ZDM FOTA Prepare orange button.
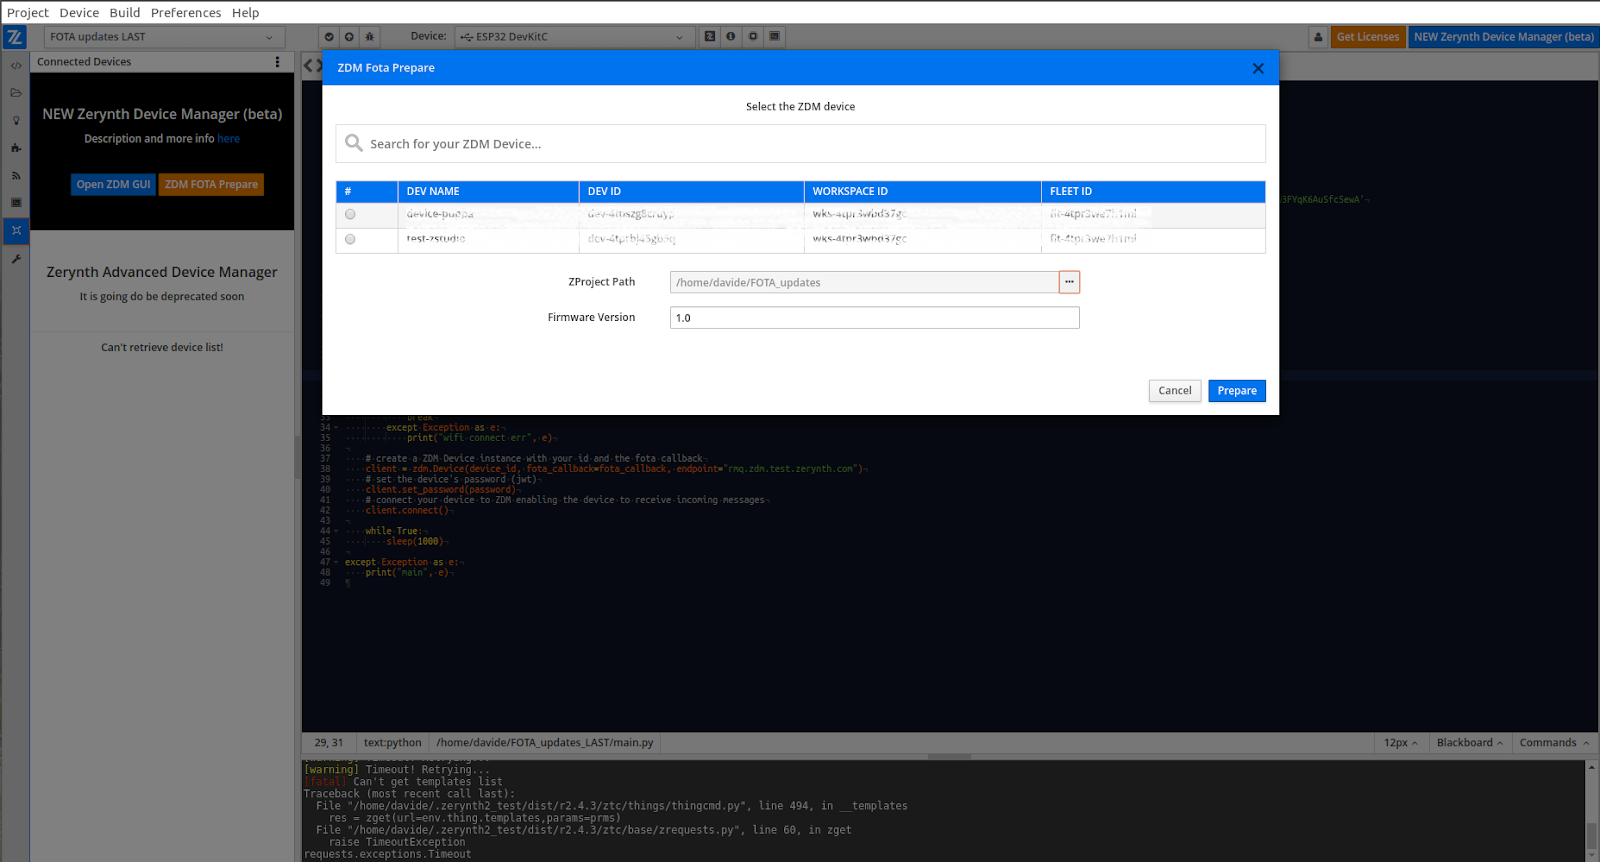
Select the ZDM device you want to update and indicate a unique firmware version identifier (you can’t reuse a version identifier previously used), click prepare.
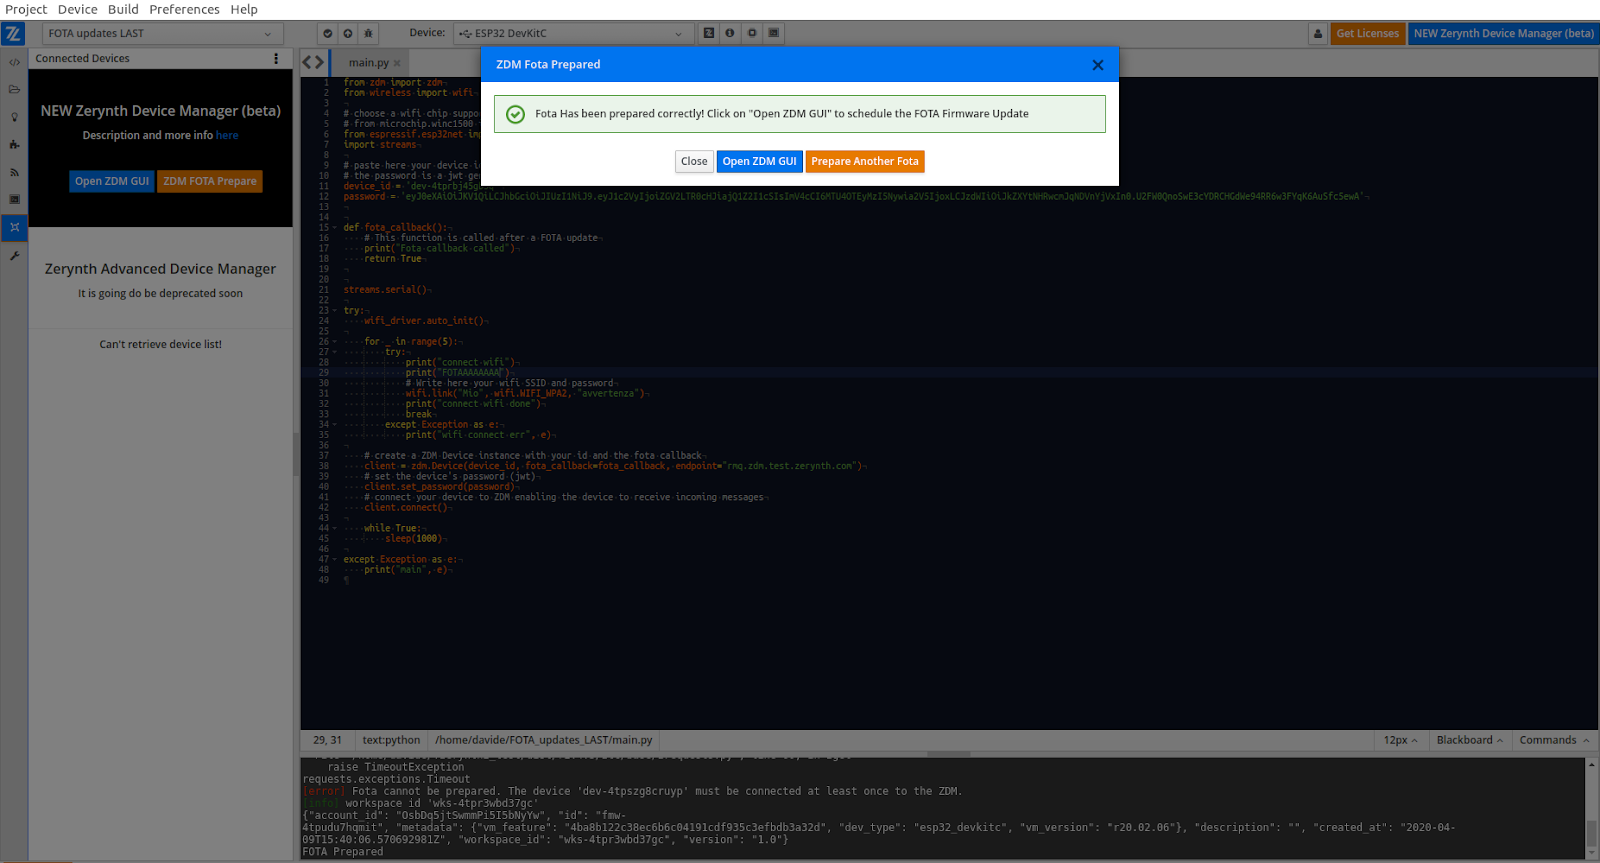
When the firmware preparation and upload process will be completed Zerynth Studio will prompt you to another window. If you want to go ahead with the FOTA procedure click Open ZDM GUI.
You will be redirected to the ZDM selected device page.
Just click FOTA, select the firmware you just uploaded and click Start.
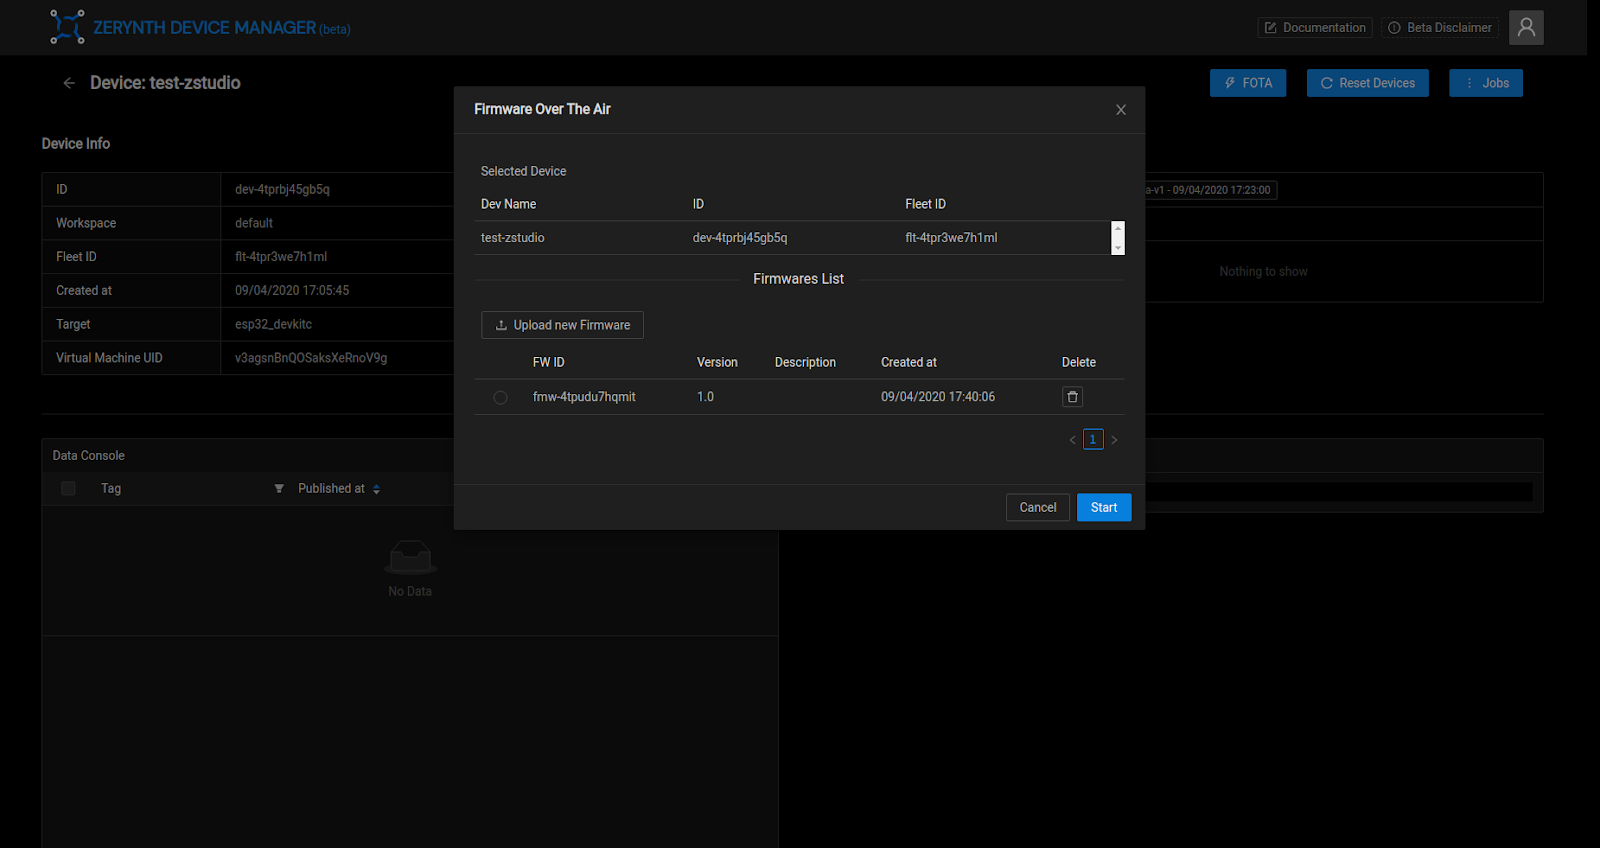
The FOTA procedure will be scheduled on your device. Refresh the device Status form and you will see the status of the FOTA procedure.
Jobs
Jobs are device actions that the ZDM will be scheduled. Jobs need to be enabled on device firmware associating the functions that will be called when a job request is received.
Once your device or devices are online and programmed with custom Jobs, you can select one or more devices and click the “Jobs” button.
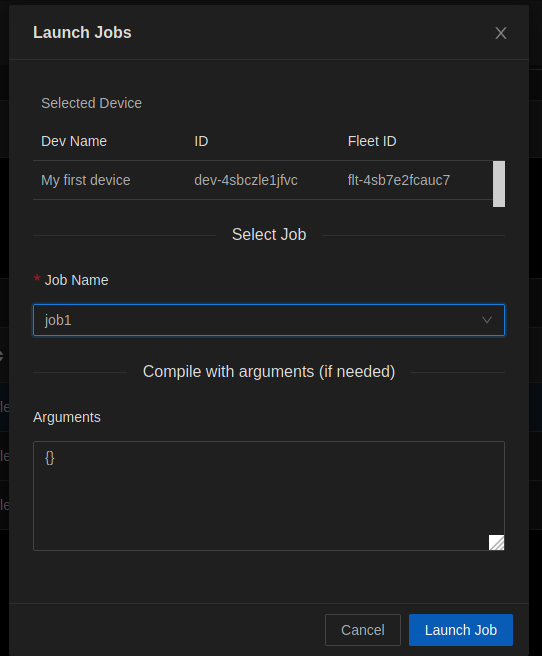
A dialog will come up, which will summarize the list of devices you have selected.
You will see a cascader with the Jobs that are common to all the devices you have selected.
Select one, optionally fill in the text box below with the arguments if required, and click the “Launch” button.
Note
If the selected devices do not have common Jobs, or if you select devices without custom Jobs defined in the firmware you will get the: “No Jobs found” message.
Device Page
On the page of a specific device, you will see the info about that device, then the name, the creation date, workspace and fleet of belonging, etc.
In addition you will see the Tag Console, which will show you in real time the data that that device is publishing in a specific tag.
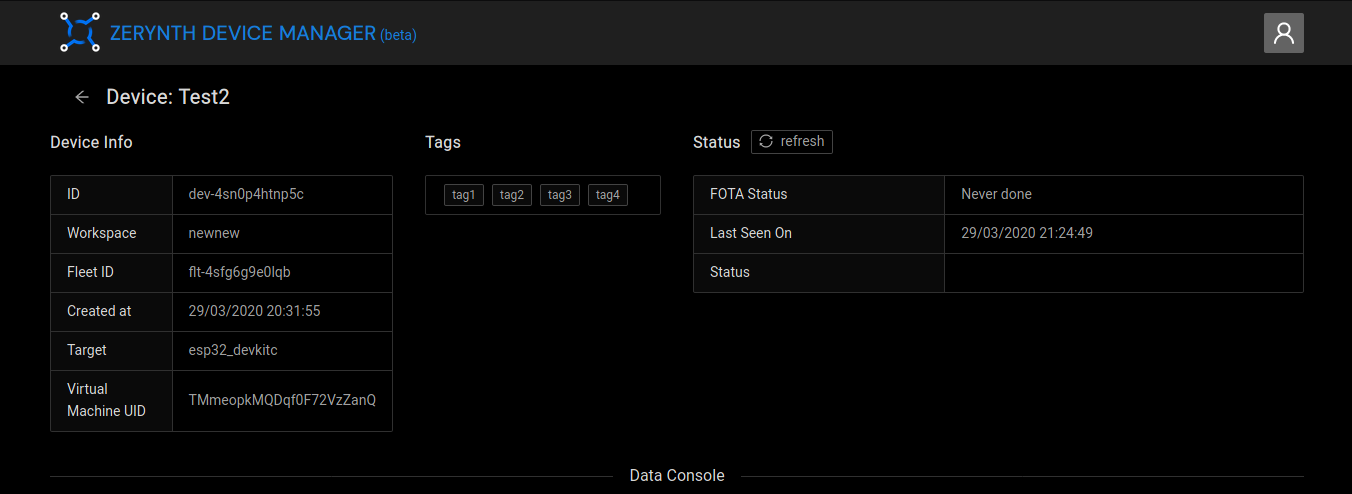
At the top you can see some summary information on your device such as name, id, fleet to which it belongs, associated tags, the firmware version, the status of the jobs called and the last time your device was seen online.
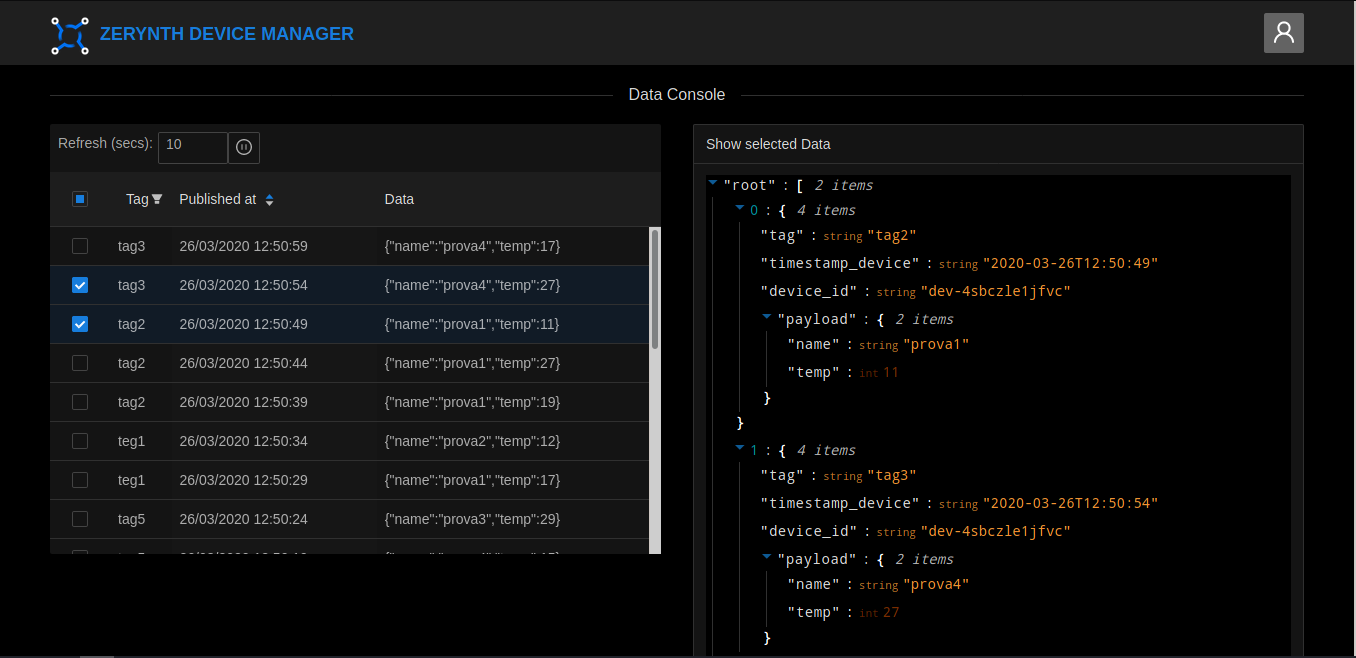
Data Console
At the end of device pages, you can find the Data Console, it allows you to see what data your device publishes in real time.
By clicking in the left checkboxes you can better navigate the published data, they will be presented on the right in the “Show selected Data” box.
The ZDM Command Line Interface
This section is a guide for the most used ZDM CLI commands.
Note
that the zdm command line interface is available from Zerynth >= r2.4.3, download it here or update to the last version!
Adding ZDM to the OS path
In order to use the zdm command line interface, you need to add it to your OS path:
On Linux: open the terminal and launch the following command:
~/.zerynth2/sys/cli/zpm setpaths
On Windows: open the command prompt as administrator and launch the following command:
%userprofile%\zerynth2\sys\cli\zpm setpaths
On Mac: open the terminal and launch the following command:
~/.zerynth2/sys/cli/zpm setpaths
Now you can use the zdm command line interface by typing on your command prompt
zdm
–help. For examplezdm –help or zdm device –help.
Login
The first step to use the ZDM (Zerynth device manager) using the Zerynth Toolchain is to log in using your Zerynth account.
Open a terminal and type this command to login with your Zerynth account:
zdm login
Copy the generated token and paste it into the terminal.
If you’re logging in for the first time, a default workspace and a default fleet will be created for your account.
The first step to work with your devices and ZDM is to associate your devices to a fleet inside a workspace, so you can choose to use the default ones or to create your first custom workspace and fleet.
Account commands
Account’s information
Once you’re logged in, if you want to see your account information use the command:
zdm profile
To logout of the ZDM give the command:
zdm logout
Workspaces
Workspace creation
To create a new workspace use the following command:
zdm workspace create [WorkspaceName]
You can also give your workspace a description using the option –description
If you create a workspace, you will see your workspace’s information:
| ID | Name | Description |
|---|---|---|
| wks-id | my-first | description |
Once you’ve created a workspace, you should create a fleet inside to be able to manage your devices’ data.
Copy your new workspace’s id or use the list workspaces command to see all your workspaces.
List workspaces and workspace information
If you want to see the list of workspaces you’ve created, their name, description and id
type the command:
zdm workspace all
zdm workspace get [WorkspaceId]
Fleets
Fleet creation
To create a new fleet type the following command:
zdm fleet create [FleetName] [WorkspaceId]
A result message with the fleet name will be shown.
List fleets and fleet information
If you want to see the list of fleets you’ve created type:
zdm fleet all
Devices
Device creation
Once you have created a new workspace and fleet, or you’ve decided to skip and to use the default ones, you can create a new device.
To create a device type the command:
zdm device create [DeviceName] [FleetId]
If you don’t specify a fleet id, the device will be associated to the default fleet in the default workspace.
To authenticate your new device, you have to generate a key for the device with the corresponding command. Let’s see a description of the other commands you can use to manage devices.
Device list and device information
If you want to list your devices or to get a device information you can use the list and get commands, to see the device name, id, and fleet id.
Give the command:
zdm device all
zdm device get [DeviceId]
Get the device’s workspace
To get the workspace’s name and id that contains your device, you can use the following command:
zdm device workspace [DeviceId]
To be able to manage your device’s data you have to create a key at first and then generate a password (as jwt token) from the created key.
The generated key can be used as the password to connect your device to the ZDM in your firmware.
You can generate different keys with different names for your devices with the command:
Create a new key.
zdm device key create [DeviceId] [Name]
zdm device key generate [DeviceId] [KeyId]
You can use ZDM to remotely send a job command to your devices.
To send a new job to a device, you just have to start it using the command:
zdm job schedule [name] [devices]
The ‘devices’’ argument is a list of the device ids you want to schedule the job (i.e. [“device1”, “device2”]).
If the device needs some arguments to execute the job, you can use the –arg option.
Events
You can use ZDM CLI to see the last 25 events sent by your devices.
Use the command
zdm event list [workspaceId]
--device-id [deviceId]
--start [startDate]
--end [endDate]
Important: In order to perform the FOTA of a device you need to have a Virtual machine with the “Fota Enable” feature.
Upload a firmware
The first step to start a FOTA update on your devices is to upload a firmware to the ZDM cloud.
To upload your firmware, use the command:
zdm fota prepare [firmwareProjectPath] [DeviceId] [Version]
-
firmwareProjectPath is the firmware’s project location in your local file system,
-
deviceId is the id of the device you want to update,
-
version is a string used to label your firmware (e.g., “1.0”)
Note that the firmware will be associated with the workspace that contains your device.
If you will associate new devices to the same workspace you can send them the same firmware.
Start FOTA
Once you’ve uploaded your firmware, you can send the FOTA command to the device typing:
zdm fota schedule [FirmwareVersion] [DeviceId]
schedule the new firmware to the device with id dev-yyyyy
zdm fota schedule 1.0 dev-yyyy
To check the status of a FOTA you started, to know if the device finished the task or if an error occurred, give the following commands to have a list of your fota and their status:
zdm fota check [DeviceId]
Using the ZDM you’re able to also receive your device’s data on your webhooks.
For example you can send data to a WebHook server or to Ubidots (see the example section).
Now let’s see a complete example, on how to connect a device to the ZDM and see data using an Ubidots dashboard and widgets.
Zerynth Device Manager CLI Programming Guide
ZDM API documentation
TK
ZDM GATES
TK
ZDM Client Python Library for PC and Raspberry
Zerynth Device Manager can be used for orchestrating both MCU (microcontroller) and CPU (microprocessor) based devices. If you want to connect an MCU device like a Raspberry PI, an SBC (Single Board Computer) a PC, or any Python application in general, the ZDM Client Python Library is what you need.
Installation
The latest stable version of the ZDM-Client Python Library is available on PyPI (https://pypi.org/project/zdm-client-py/)
The installation assumes that you have installed the latest Python version with pip.
In order to install the ZDM-Client Python Library, type the following command or add the zdm-client-py into the requirements.txt file.
pip install zdm-client-py
git clone https://github.com/zerynth/zdm-client-py.git
virtualenv venv
pip install
Once you have installed the ZDM-client Python lib you can use it for connecting your CPU based device to the ZDM and stream your data.
Login to the ZDM in order to obtain the device id and the password of a device (see the ZDM getting started guide for more info)
Create a new file zdm_basic.py and copy the following script and replace the obtained device id and password in the placeholders.
CODE TO BE TAKEN FROM WP ARTICLE
Jobs
In addition, the ZDM-client Python lib permits also to define a set of jobs on the client that can be invoked by the ZDM.
The jobs are passed to the ZDMClient as a dictionary, where the key is the name of the job and the value is the corresponding function to execute.
The example below illustrates a simple example of a client exposing one job named set_temp.
Upon the device receiving the Job, it executes the corresponding function and returns a result of a JSON object.
Copy the following script into a new file hello_jobs.py.
CODE TO BE TAKEN FROM WORDPRESS
Now, you can schedule the job in two different ways: by using the ZDM UI or the ZDM CLI.
ZDM UI
Steps needed to execute the job “set_led” on the device by using the ZDM UI:
-
Login to the ZDM (https://zdm.zerynth.com/login)
-
Click on the workspace where the device is associated.
-
On the section “My Devices”, click the checkbox of the device
-
Click on the button “Jobs”, and on the popup select the job Name “set_temp” in the Job Name dropdown menu.
-
Add to the “Arguments” section any arguments of the function in json format (if any). For this example, you can leave the field empty.
-
Click on “Launch Job” button.
ZDM CLI
Steps needed to execute the job “set_led” on the device by using the ZDM CLI.
Make sure you have configured the ZDM CLI (https://www.zerynth.com/blog/docs/the-tools/zdm/getting-started/).
In order to schedule the job, type the following command (where the DEVICE_ID must be substituted with the actual id of the device):
zdm job schedule set_temp <DEVICE_ID>
Expected result:
If the job has been correctly scheduled to the zdm client py, the following message will appear in the console:
Executing job set_temp. Received args: {}

[INFO | zdmclient.py:185] > [DEVICE-ID] job set_temp executed with result res:{"msg": "Temperature set correctly."}

That’s all! Edit the script file and build your own ZDM powered IOT project!